Effects are created using vanilla JavaScript on an HTML5 canvas element. In this section, we will cover the basics: drawing shapes, drawing with iteration, and adding motion.
Drawing Shapes
For this tutorial I will be using a generic lightscript template:
xxxxxxxxxx<head> <meta description="Template"/> <meta publisher="WhirlwindFX" /></head> <body style="margin: 0; padding: 0;"> <canvas id="exCanvas" width="320" height="200"></canvas></body> <script> // Get the canvas element from the DOM var c = document.getElementById("exCanvas"); var ctx = c.getContext("2d"); var width = 320; var height = 200; var hue = 0; function update() { // Code goes here window.requestAnimationFrame(update); } window.requestAnimationFrame(update);</script>Lines
Whether using one line or many, the process remains the same.
- ctx.beginPath() starts your shape
- ctx.moveTo(x, y) sets the first point
- ctx.lineTo(x, y) sets the next point and a line back to the first. Use multiple lineTo's to draw larger shapes.
- Set ctx.strokeStyle and/or ctx.fillStyle (if the shape is closed)
- Use ctx.stroke() to draw the lines, and ctx.fill() to fill any closed shapes. It’s important to note that up until this point, everything is hypothetical - nothing is drawn until these commands are executed.
Here are three examples using lines:
xxxxxxxxxxfunction update() { // One Line ctx.beginPath(); ctx.moveTo(30, 30); ctx.lineTo(30, 170); ctx.strokeStyle = "blue"; ctx.stroke(); // L ctx.beginPath(); ctx.moveTo(80, 30); ctx.lineTo(80, 100); ctx.lineTo(120, 100); ctx.strokeStyle = "blue"; ctx.stroke(); // Filled Triangle ctx.beginPath(); ctx.moveTo(130, 30); ctx.lineTo(130, 100); ctx.lineTo(170, 100); ctx.lineTo(130, 30); ctx.fillStyle = "red"; ctx.strokeStyle = "blue"; ctx.fill(); ctx.stroke(); window.requestAnimationFrame(update);}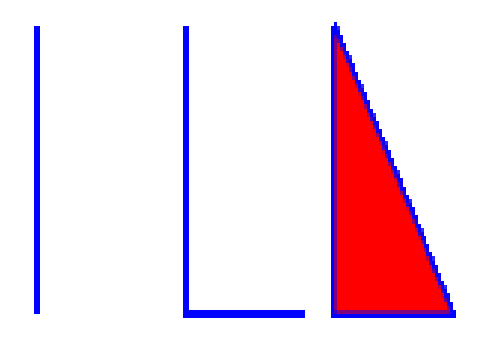
It's important to note the draw order here: the filled triangle is drawn last, so it would cover the other two shapes if they were in the same position. Additionally, the stroke in the triangle is drawn after the fill. If we reversed these steps, the interior half of the stroke would be covered by the red fill.
Rectangles
Rectangles are simple and useful, especially for the average resolution of an RGB keyboard. The process is similar to drawing lines - just replace the moveTo and lineTo commands with rect(x, y, width, height).
xxxxxxxxxxfunction update() { // Basic Square ctx.beginPath(); ctx.rect(30, 30, 75, 75); ctx.strokeStyle = "blue"; ctx.stroke(); // Filled Rectangle ctx.beginPath(); ctx.rect(125, 30, 125, 100); ctx.fillStyle = "red"; ctx.strokeStyle = "blue"; ctx.fill(); ctx.stroke(); window.requestAnimationFrame(update); }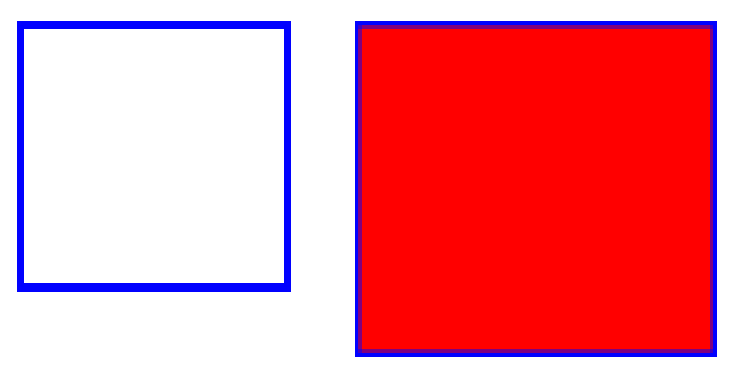
Arcs
Arcs are drawn by rotating an outer point around a central point, and can be used to create full circles. The arc command is ctx.arc(x, y, radius, start angle, end angle), where both angle measure are given in radians. Unlike rectangles, an arc is drawn with the shape's origin (x, y) in the center of the arc.
xxxxxxxxxxfunction update() { // Half-circle ctx.beginPath(); ctx.arc(70, 100, 30, 0, Math.PI); ctx.strokeStyle = "blue"; ctx.stroke(); // 3/4 circle ctx.beginPath(); ctx.arc(140, 100, 30, 0, Math.PI * (3/2)); ctx.strokeStyle = "blue"; ctx.stroke(); // Full circle ctx.beginPath(); ctx.arc(210, 100, 30, 0, Math.PI * 2); ctx.strokeStyle = "blue"; ctx.stroke(); ctx.fillStyle = "red"; ctx.fill(); window.requestAnimationFrame(update); }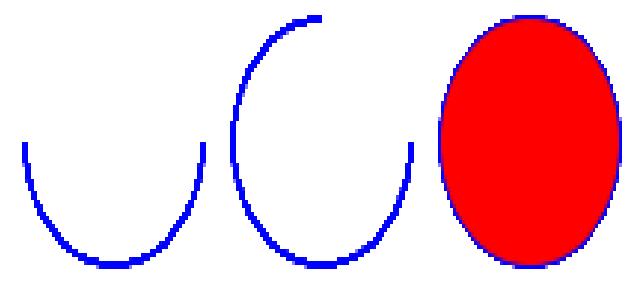
As you can see, arcs are drawn clockwise by default. This can be reversed with an end angle that is less than the start angle, or by adding "true" as a final argument to the ctx.arc() method.
Drawing With Iteration
Drawing three shapes by hand can easily take twenty lines of code, so if you need to draw one hundred shapes, we need a more efficient approach. Loops in JavaScript are a simple way to repeat tasks, and they can be applied to drawing as well.
Here’s an example using a for-loop to draw a row of checkered squares:
xxxxxxxxxxfunction update() { for(let i = 0; i < 8; i++){ // 1. Create rectangle path and draw the stroke for each. ctx.beginPath(); ctx.rect(i * 20, 20, 20, 20); ctx.strokeStyle = "black"; ctx.stroke(); // 2. If 'i' is even, the fillStyle is black. Otherwise it's white. if(i % 2 == 0){ ctx.fillStyle = "black"; } else { ctx.fillStyle = "white"; } // 3. Fill the shape after setting the fillStyle. ctx.fill(); } window.requestAnimationFrame(update); }
Here is a while-loop example to draw a checkered grid. I will change the lightness of the black squares and the hue of the white squares slightly in each iteration using template literals.
function update() { var i = 0; while(i < 16){ // 1. X and Y calculations with 'row' and 'column' // This operation rounds the result down to the nearest integer. For i = (0-3) the row will be 0, for i = (4-7) the row will be 1, and so on var iRow = Math.floor(i / 4); // This operation finds the remainder after division, limiting column to the (0-3) range. var iCol = i % 4; // Multiply by the square width to find this square's x-origin var ix = iCol * 20; // Multiply by the square height to find this square's y-origin var iy = iRow * 20; // 2. Path and stroke ctx.beginPath(); ctx.rect(ix, iy, 20, 20); ctx.strokeStyle = "black"; ctx.stroke(); // 3. If the row is even, every other square is filled black. If odd, switch the black squares. Each iteration adds a small amount of the lightness component to the black, and hue to the white. if(iRow % 2 == 0){ if(i % 2 == 0){ // 'Black' ctx.fillStyle = `hsl(1, 0%, ${5 * i}%)` } else { // 'White' ctx.fillStyle = `hsl(${10 * i}, 100%, 50%)`; } } else { if(i % 2 == 0){ // 'White' ctx.fillStyle = `hsl(${10 * i}, 100%, 50%)`; } else { // 'Black' ctx.fillStyle = `hsl(1, 0%, ${5 * i}%)` } } ctx.fill(); i++; } window.requestAnimationFrame(update); }
Adding Motion
Animations in the canvas are limited only by your imagination and your mathematical knowledge. If you feel shaky with trigonometry or geometry I would recommend doing some light research in order to push your skills to the next level. Over the next few examples I will take a stationary circle and attach every possible variable to a simple oscillating motion.
The gold standard for oscillation (regular back-and-forth movement) is to take the sin() or cosine() of a timer. Either operation will return a value between -1 and 1 for ANY value passed in, even if it is only counting up. The only difference between the two is that they are slightly out of sync - when cos is 0 sin is -1 or 1, and vice versa. We can use this to our advantage in this animation -
xxxxxxxxxxfunction update() { // Find current time in milliseconds, then divide to slow down the animation speed let time = Date.now() / 100; // Draw a background so the old shapes don't stick around ctx.fillStyle = "white"; ctx.fillRect(0, 0, 320,200); ctx.beginPath(); //USE ONE EXAMPLE AT A TIME // 1st example - side to side, y is constant ctx.arc(15 * Math.cos(time) + 160, 100, 30, 0, Math.PI * 2); // 2nd example - up and down, x is constant ctx.arc(160, 15 * Math.sin(time) + 100, 30, 0, Math.PI * 2); // 3rd example - circle, x and y are variable ctx.arc(15 * Math.cos(time) + 160, 15 * Math.sin(time) + 100, 30, 0, Math.PI * 2); ctx.fillStyle = "black"; ctx.fill(); window.requestAnimationFrame(update); }Side-to-Side
Up-and-Down

Full Circle
We only have a few more attributes to alter over time - circle radius, fill, and stroke. I'll be leaving the arc angles alone for now to keep the shape simple because the rest will be pretty flashy.
xxxxxxxxxxfunction update() { let time = Date.now() / 100; ctx.fillStyle = "white"; ctx.fillRect(0, 0, 320,200); ctx.beginPath(); ctx.arc(15 * Math.cos(time) + 160, 15 * Math.sin(time) + 100, 30 + 15 * Math.sin(time), 0, Math.PI * 2); ctx.fillStyle = `hsl(${180 + 180 * Math.cos(time)}, 100%, 50%)`; ctx.fill(); ctx.strokeStyle = `hsl(${180 + 180 * Math.sin(time)}, 100%, 50%)`; ctx.stroke(); window.requestAnimationFrame(update); }
Every attribute of every shape we have created so far can be altered over time, and every animation I make is a combination of the above skills. For more detail on crafting re-usable, efficient animations, check out our Callbacks page!