This tutorial will explore some variations on the color cycle example from "Meet the Canvas." It includes instructions on animation and some basic user controls.
Basic Color Cycle
This effect consists of a rectangle that fills the entire canvas and changes color over time. The user can edit the speed of the color shift.
xxxxxxxxxx<head> <title>Generic</title> <meta description="Template"/> <meta publisher="WhirlwindFX" /> <!-- 1. Create numeric slider to edit the animation speed --> <meta property="speed" label="Cycle Speed" type="number" min="1" max="10" default="2"></head> <body style="margin: 0; padding: 0;"> <!-- 2. Create the canvas element inside of the body tag --> <canvas id="exCanvas" width="320" height="200"></canvas></body> <script> // 3. Get the canvas element from the DOM var c = document.getElementById("exCanvas"); var ctx = c.getContext("2d"); // 4. Declare script variables var width = 320; var height = 200; var hue = 0; // 5. Write update function to render each frame function update() { // 6. Set fillstyle, hue is variable over time ctx.fillStyle = 'hsl('+ hue + ', 100%, 50%)'; // 7. Use the fillRect method to create the path and draw in the same command ctx.fillRect(0, 0, width , height); // 8. Iterate the hue by the speed set by the user. Small adjustment made for better user slider. hue+=(speed / 4); // 9. Limit hue to the 0-360 range for use with hsl if (hue > 360) { hue = hue % 360; } // 10. Re-call the update function at the end of every update window.requestAnimationFrame(update); } // 11. Initial update call window.requestAnimationFrame(update);</script>
The result is colorful but basic. We can do more with the canvas!
Gradient Color Cycle
Here, I've replaced the single color with a gradient that shifts over time. The user can edit the speed of the color shift, as well as the distance of each gradient point from the rest.
<head> <title>Generic</title> <meta description="Template"/> <meta publisher="WhirlwindFX" /> <meta property="speed" label="Cycle Speed" type="number" min="1" max="10" default="2"> <!-- 1. Create numeric slider to edit the color width of the gradient --> <meta property="distance" label="Color Distance" type="number" min="1" max="160" default="50"></head> <body style="margin: 0; padding: 0;"> <canvas id="exCanvas" width="320" height="200"></canvas></body> <script> var c = document.getElementById("exCanvas"); var ctx = c.getContext("2d"); var width = 320; var height = 200; // 2. Initial hue is set to 0 var hue1 = 0; function update() { // 3. Create two more colors for use with the gradient by adding the user's color width. hue1+=(speed / 4); hue2 = hue1 + distance; hue3 = hue2 + distance; // 4. Limit each individual hue to the 0-360 range if (hue1 > 360) { hue1 = hue1 % 360; } if (hue2 > 360) { hue2 = hue2 % 360; } if (hue3 > 360) { hue3 = hue3 % 360; } // 5. Create a linear gradient. Mine starts at (0, 0) and is translated directly horizontally by the width. Changing the last 0 to an integer would add a vertical component to the gradient. var grd = ctx.createLinearGradient(0, 0, width, 0); //6. Set gradient color stops with the hues. I have one at far left, one middle, and one far right. grd.addColorStop(0, `hsl(${hue1}, 100%, 50%)`); grd.addColorStop(.5, `hsl(${hue2}, 100%, 50%)`); grd.addColorStop(1, `hsl(${hue3}, 100%, 50%)`); // 7. Set fillstyle and draw rectangle ctx.fillStyle = grd; ctx.fillRect(0, 0, width , height); window.requestAnimationFrame(update); } window.requestAnimationFrame(update); </script>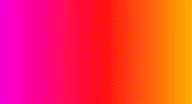
Pixelated Color Cycle
This one got a little complicated, so bear with me on the math. Our final color cycle is a pixelated, snake-like color crawl.
<head> <title>Generic</title> <meta description="Template"/> <meta publisher="WhirlwindFX" /> <meta property="speed" label="Cycle Speed" type="number" min="1" max="10" default="2"> <meta property="distance" label="Color Distance" type="number" min="1" max="10" default="2"> <!-- 1. Create numeric slider to edit the pixel density of the cycle --> <meta property="density" label="Pixel Density" type="number" min="0" max="2" default="1"></head> <body style="margin: 0; padding: 0;"> <canvas id="exCanvas" width="320" height="200"></canvas></body> <script> var c = document.getElementById("exCanvas"); var ctx = c.getContext("2d"); var width = 320; var height = 200; var hue = 0; function update() { // 2. Draw a white background to overwrite previous frames ctx.fillStyle = "white" ctx.fillRect(0, 0, width, height) hue += (speed/4); if(hue > 360) { hue = hue % 360; } // 3. Calculate the square size from user input. Based on our 320x200 screen ratio, my 4 possible values are 5px, 10px, 20px, and 40px squares. You can calculate size with the equation 10 * 2 ^ density. var size = 10 * Math.pow(2, density); // 4. Calculate the total number of squares by dividing the screen pixel area (320 * 200) by the square pixel area. var goal = 64000 / (size * size); // 5. While loop will run until we hit the specified number of squares var i = 0; while(i < goal){ // 6. Calculate row and column multiplyer, same as grid example in HTML5+JS var iRow = Math.floor(i / (width / size)); var iCol = i % (width / size); // 7. Calculate (x ,y) for each square based on row and column multiplyer var ix = iCol * size; var iy = iRow * size; // 8. Calculate the variable color of each square based on user input. Make sure to include the index in your calculation so each square is different from the next. var iHue = hue + (i * distance); if(iHue > 360){ iHue = iHue % 360; } // 9. If the iRow calculation is odd, flip the horizontal draw direction. if(iRow % 2 != 0){ ix = (width - size) - iCol * size; } ctx.beginPath(); ctx.rect(ix, iy, size, size); ctx.fillStyle = `hsl(${iHue}, 100%, 50%)`; ctx.fill(); i++; } window.requestAnimationFrame(update); } window.requestAnimationFrame(update); </script>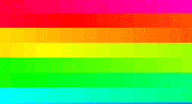
I hope you had some fun working on color cycles! For a tutorial involving class-based behavior and some minor physics, check out the Ball Class page.