Now we have a fully functional device, but our LEDs are not properly mapped out.
To map our LED positions in SignalRGB, we need to use the paint tool.
To use the paint tool, we need to open SignalRGB.
Then we need to go to the devices page and go to our device.
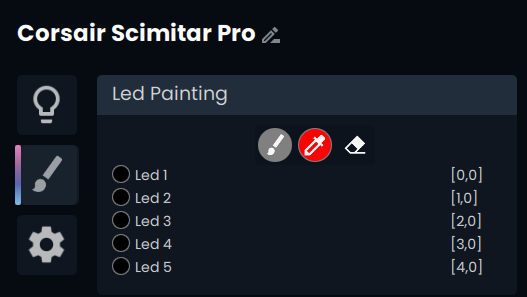
Now we need to click the paintbrush tab, and click on the paintbrush icon.
Naming LEDs
Now we am going to start painting our LEDs, and as we paint each one, we are going to name each LED in our plugin with what it corresponds to on the device..
After painting all of our LEDs we end up with the mapping shown below.
xxxxxxxxxxvar vLedNames = [ "Logo", "Scroll Wheel", "Keypad", "Front", "DPI Indicator Light" ]; var vLedPositions = [ [0,0], [1,0], [2,0], [3,0], [4,0] ];Now all of our LEDs are properly named, but we still need to properly map them in relation to where they are physically located on the device.
Mapping LEDs
To map our LEDs, we need to understand how the mapping system works. The position system works as [x,y]. This means that the first position (x) represents how far right the LED is positioned from the left of the device's rectangle on the effect canvas. The second position (y) represents how far down the LED is positioned from the top of the device's rectangle on the effect canvas.
Using this information and the physical location of our LEDs in mind, we end up with the proper mapping shown below.
xxxxxxxxxxvar vLedNames = [ "Logo", "Scroll Wheel", "Keypad", "Front", "DPI Indicator Light" ]; var vLedPositions = [ [1,2], [1,0], [0,1], [2,0], [0,0] ];Now that we have proper mapping for our LEDs, we need to also change the size of the device rectangle to properly represent our device's size.
Remember that our device size needs to be one larger in each direction than our furthest positions. This means that in our case, my device size needs to be [3,3], as my furthest positions in each direction are [2,2].
xxxxxxxxxxexport function Name() { return "Corsair Scimitar Pro"; }export function VendorId() { return 0x1b1c; }export function ProductId() { return 0x1B3E; }export function Publisher() { return "WhirlwindFX"; }export function Size() { return [3,3]; }export function DefaultPosition(){return [10, 100]; }export function DefaultScale(){return 8.0}Now, we have a fully functional device plugin, but it still is missing a device image.