This firmware is not officially supported by SignalRGB or QMK but by the moderator team of SignalRGB. Support can be provided either on the Github repository (Issues) or the QMK channels of this Discord (Discord will be faster in most cases).
Please keep support requests to either of those locations only, thanks!
Please note that SignalRGB and VIA do not happily run at the same time for most models. You must quit either VIA (or close the browser tab) before running SignalRGB, or close SignalRGB before attempting to use VIA as the raw_hid_ receive solution that both Software(s) use conflict with each other.
Firmware Download
Thanks to our moderator team, the vast majority of keyboards that are supported by QMK are now available to the community as pre-compiled firmware. (QMK's RGB Matrix support is required for the keyboard to be supported). The GPL source code to create this firmware can be found here.
The firmware files can be found here.
We do recommend you attempt the VIA versions first as it will allow you to fix any key mapping issues.
(Make sure to backup your current layout with VIA before flashing that way you can restore them afterwards!)
Directions for flashing the firmware are usually provided by your keyboard manufacturer. If the directions involve using QMK Toolbox make sure run QMK Toolbox as admin and to install drivers inside of QMK Toolbox!

You can ask for help in the QMK channels on this Discord as well. (Please only ask on the linked Discord, asking in the main QMK Discord will get you the response to ask us! - Which is obviously frustrating...)
Once you have completed flashing your keyboard read the guide below to get started with authoring a keyboard plugin.
SignalRGB and VIA attempt to talk to the keyboard the same way, make sure to quit SignalRGB if you wish to use VIA / quit VIA if you wish to use SignalRGB.
SRGBmods QMK Plugins Add-on Repo
Thanks to SignalRGB 2.3.20 and above the QMK Plugins add-on repo is enabled by default, this being said there are several branches in the settings of this add-on that may enable support for your keyboard. Inside of SignalRGB go to the settings / Add-on Settings / QMK-Plugins:

Main is selected by default and includes well known working plugins, the rest explain what they are... If you cannot get your keyboard working after picking any of the branches you may need to create a user plugin. Directions for this are below:
User Plugin Creation
- After flashing your keyboard, you need to modify the keyboard plugin below to get SignalRGB working with your keyboard.
- Example Keyboard Plugin can be downloaded here: QMK_Keyboard_Example.js
- Additional Plugin Templates can be downloaded (Full, TKL, 96%, 75%, 65%, 64%, 60%, etc) here.
- After downloading a keyboard plugin from either of the above, open it in a text editor.
export function Name() { return "QMK Keyboard"; }export function VendorId() { return 0x0000; }export function ProductId() { return 0x0000; }export function Publisher() { return "WhirlwindFX"; }export function Size() { return [21, 6]; }export function DefaultPosition(){return [10, 100]; }export function DefaultScale(){return 8.0}export function ControllableParameters() { return [ {"property":"shutdownColor", "group":"lighting", "label":"Shutdown Color", "min":"0", "max":"360", "type":"color", "default":"009bde"}, {"property":"LightingMode", "group":"lighting", "label":"Lighting Mode", "type":"combobox", "values":["Canvas", "Forced"], "default":"Canvas"}, {"property":"forcedColor", "group":"lighting", "label":"Forced Color", "min":"0", "max":"360", "type":"color", "default":"009bde"}, ];}- After opening the keyboard plugin, you will be presented with a screen similar to the one above.
- You will need to fill in some of these fields, starting with the Name field.
- The name field needs to be filled in with the name of the keyboard that you developed firmware for.
xxxxxxxxxxexport function Name() { return "Massdrop CTRL QMK Keyboard"; }- Next, we need to fill in the VendorId for the keyboard. (The following screenshot walkthrough other last two can be skipped with this link.)
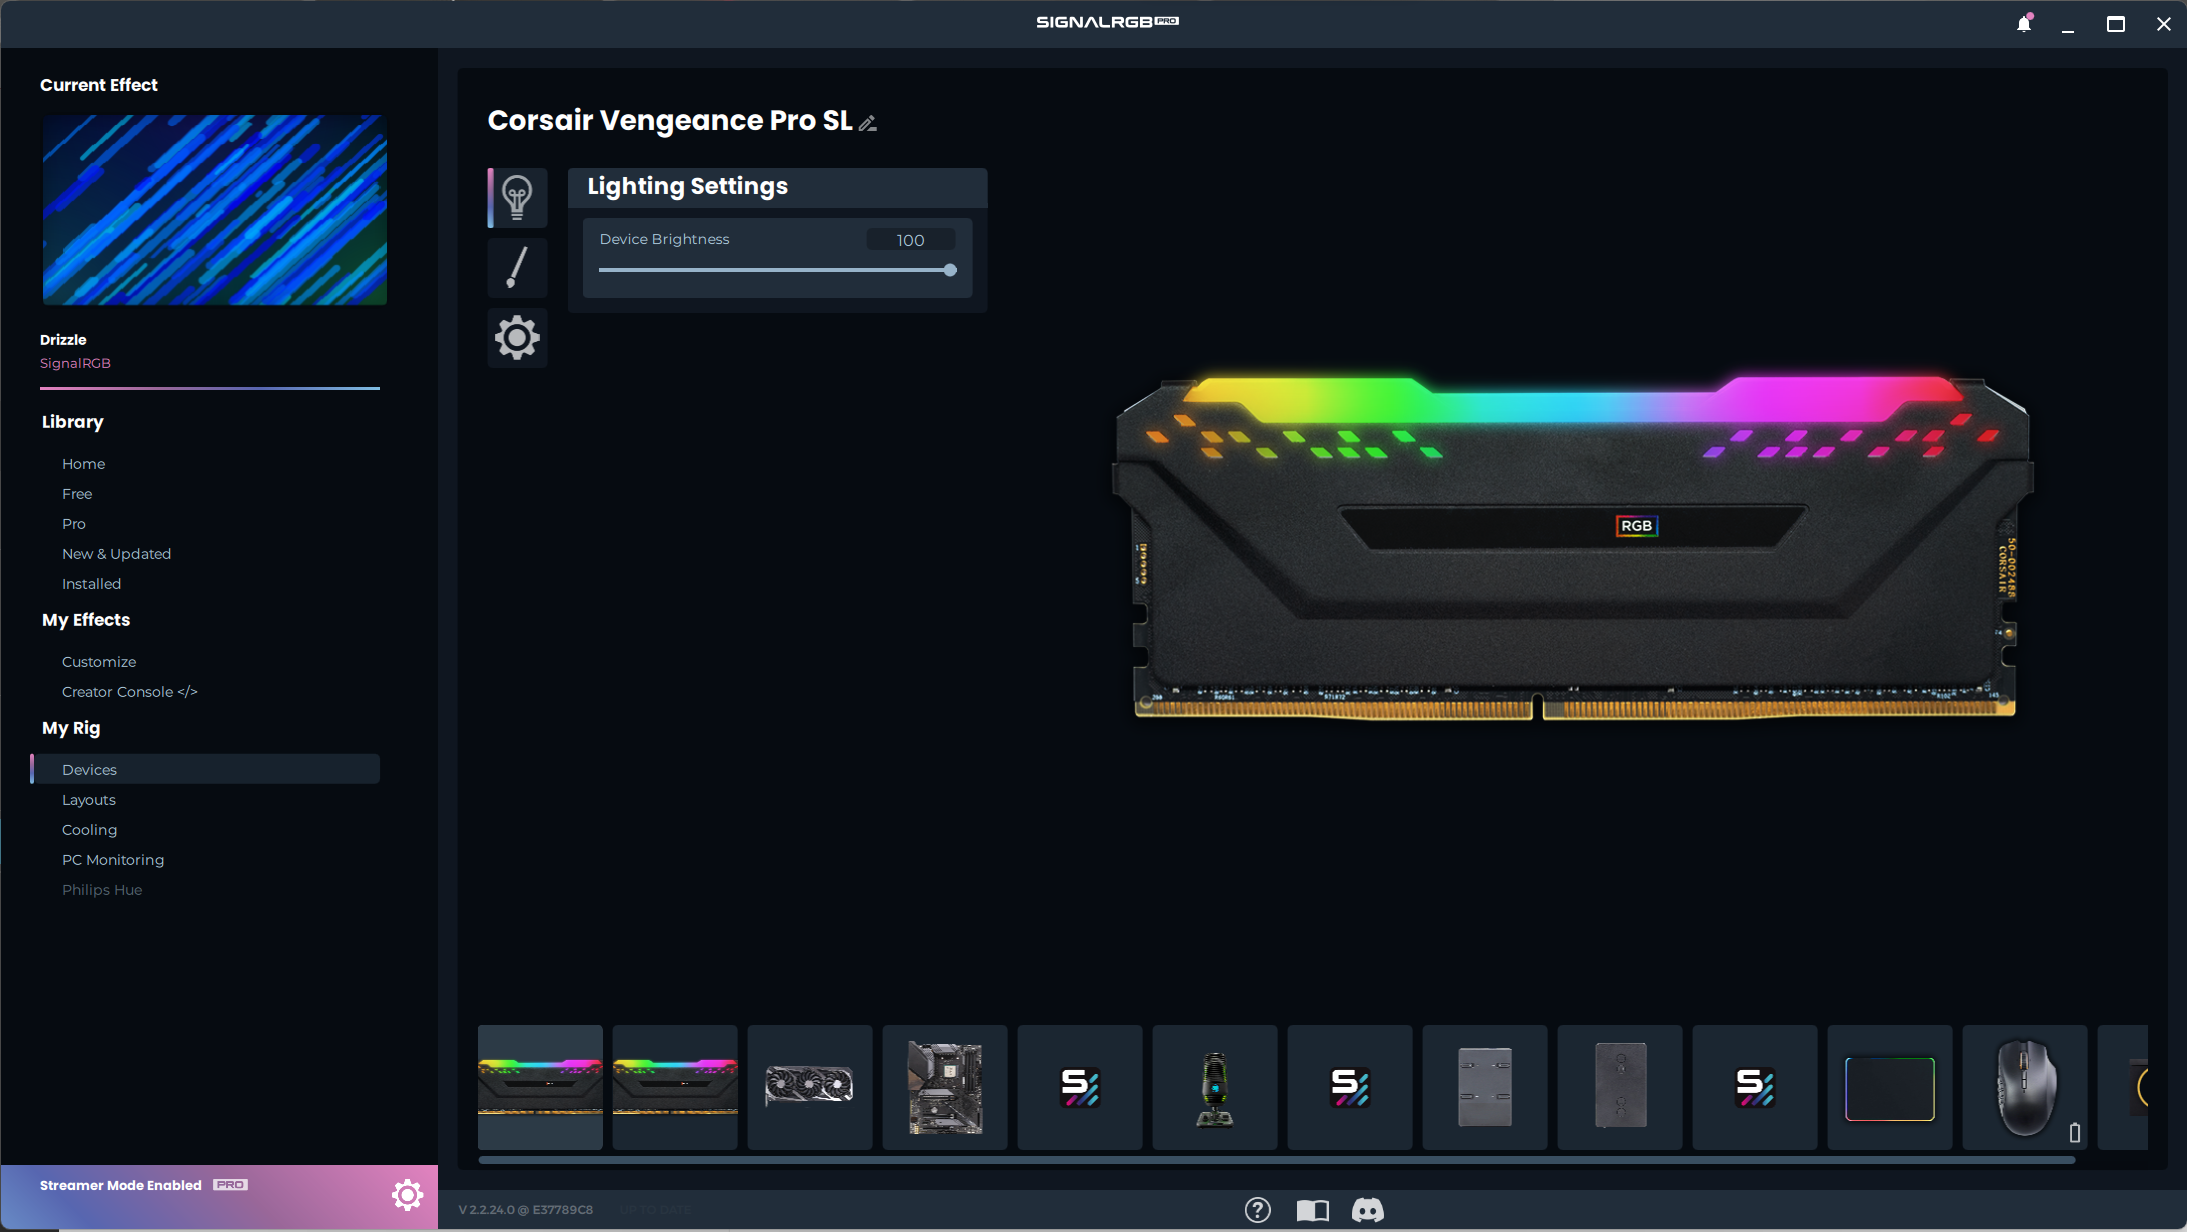
- To find the VendorId for the keyboard, open SignalRGB.
- Then click the settings cog in the bottom left corner.

Then, click on Device Information.
Find your keyboard and note down its VendorID and ProductID.


Now fill the VendorId and ProductId fields with these values.
xxxxxxxxxxexport function Name() { return "Massdrop CTRL QMK Keyboard"; }export function VendorId() { return 0x04d8; }export function ProductId() { return 0xEED2; }- The next field that needs to be filled in is the Publisher field. In the publisher field, you can put your name, username or handle.
xxxxxxxxxxexport function Name() { return "Massdrop CTRL QMK Keyboard"; }export function VendorId() { return 0x04d8; }export function ProductId() { return 0xEED2; }export function Publisher() { return "WhirlwindFX"; }- Now, we are done filling in fields, and are moving onto arrays.
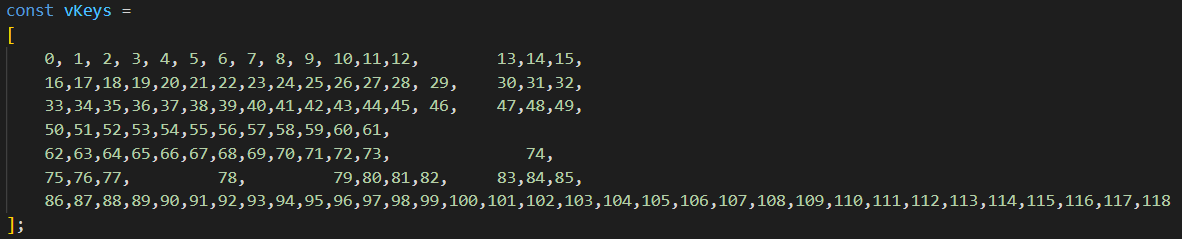
There are 3 arrays that need modified: vKeys, vKeynames, and vKeyPositions
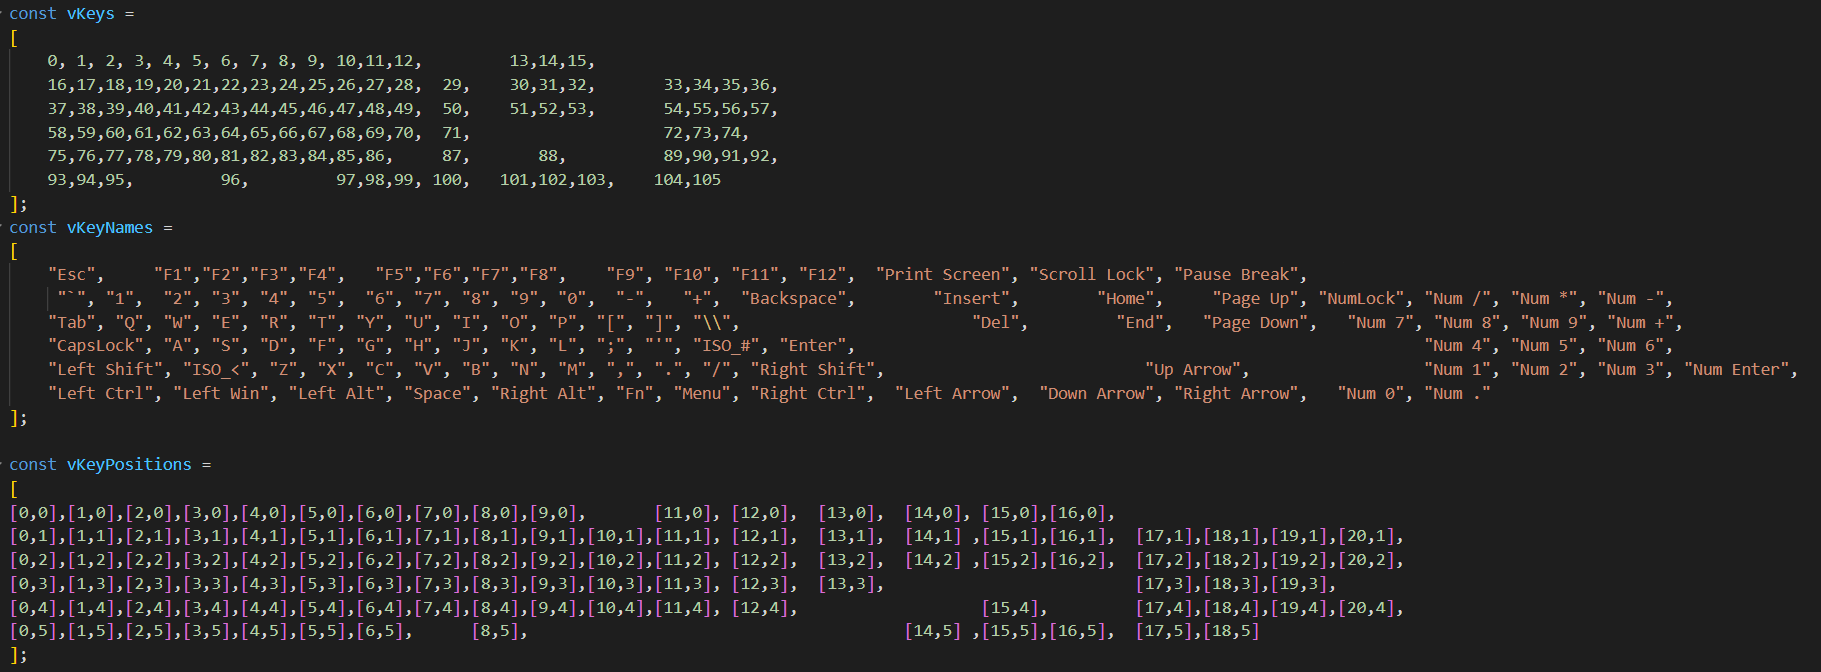
- The vKeys array maps each keyboard key to its position within the RGB Data being sent to the keyboard.
- The vKeyNames array tells us which key corresponds to each vKey and vKeyPosition.
- The vKeyPositions array tells SignalRGB where each key on the keyboard is position-wise.
- First, change the vKeyNames array to reflect your keyboard.
- This means that you need to rearrange the vKeyNames so that they match your keyboard.
- In our case, we had to remove keys and reorganize the remaining ones as our board is a TKL board.

Then update the vKeyPositions array the same way that the vKeyNames array was updated.

Finally, update the vKeys array so that it matches the vKeyNames and vKeysPositions arrays.

- Now, save your plugin file into %userprofile%/Documents/WhirlwindFX/plugins, then restart SignalRGB.
- Your keyboard should start to light up and react with SignalRGB.
If the Keyboard Does Not Light up or Does Not React Properly to SignalRGB:
- Go to the Devices page in SignalRGB.
- Next, go to your keyboard, and then click on the settings cog.
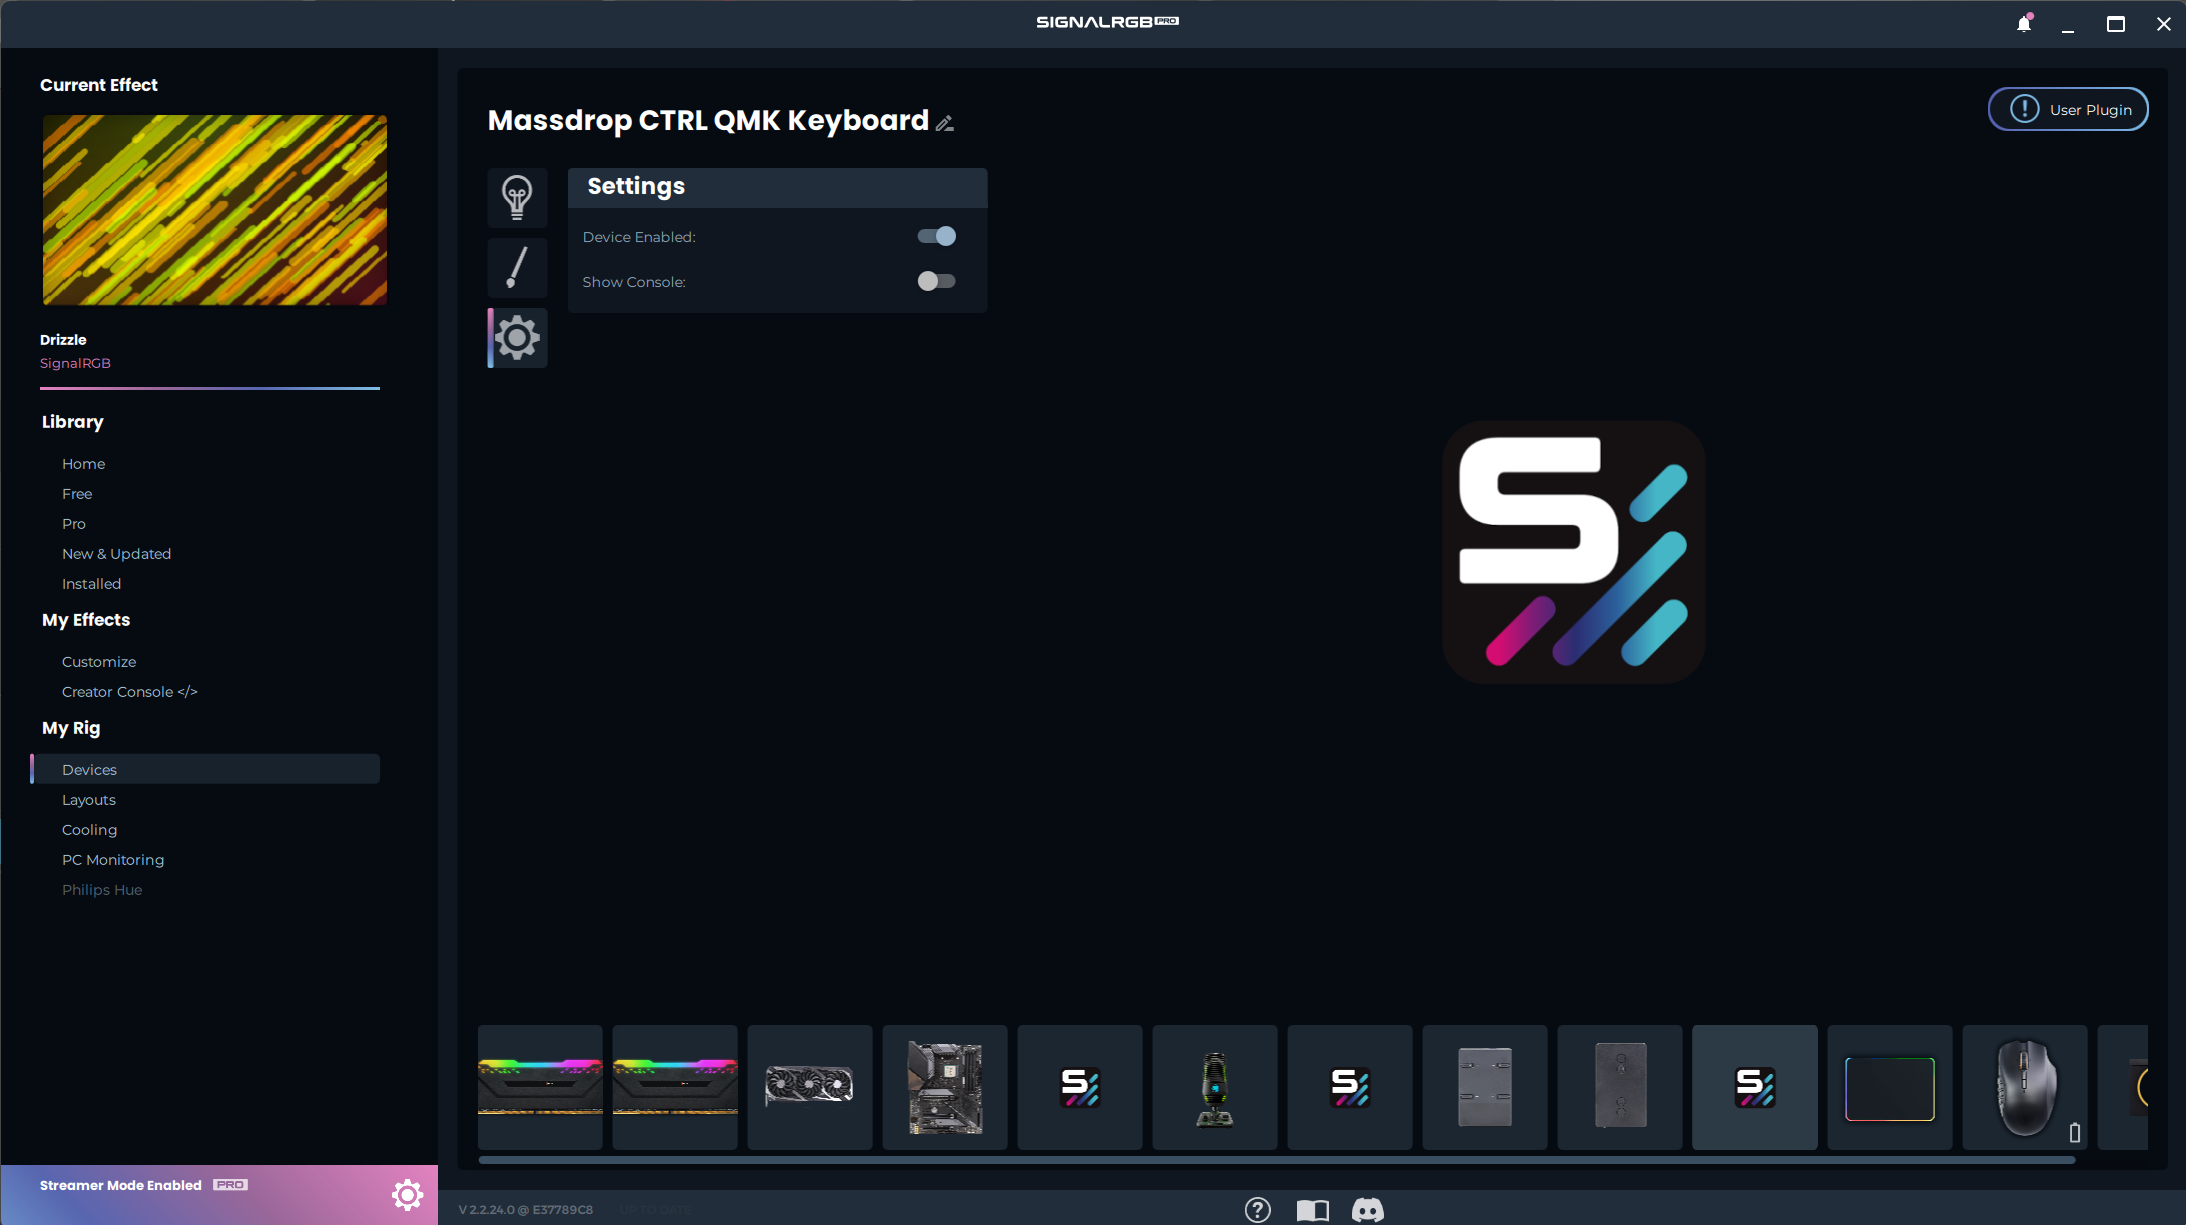
- Then, click the Show Console toggle.
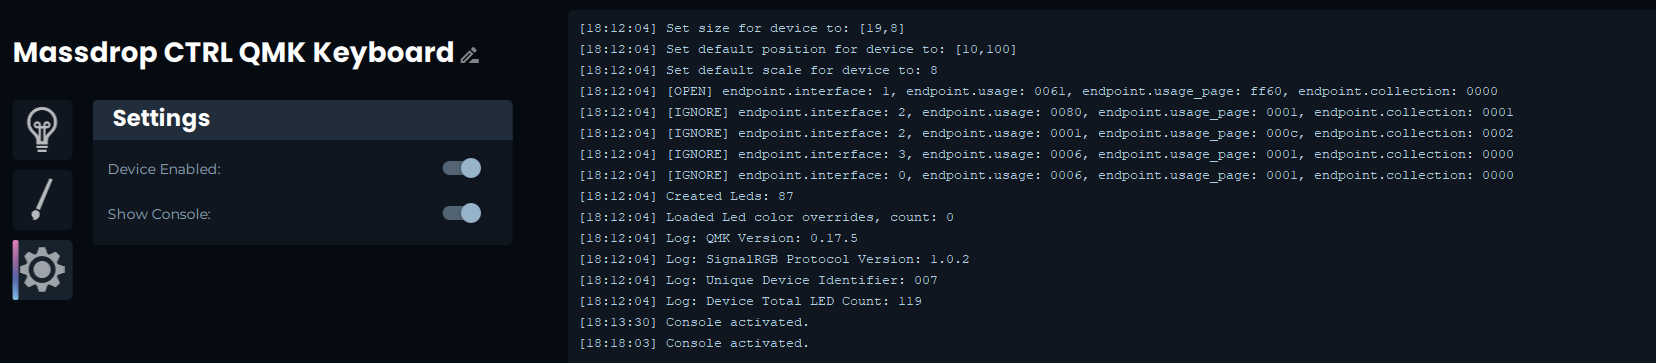
- There should be a Device Total LED Count in the console. Compare that Device Total LED Count to the number of LEDs that you have assigned.
- In our case, there are 119 Total LEDs.
If the Number of LEDs Does Match the Number of vKeys you Have:
- Ensure that the size field of your plugin is 1 larger in each direction than your highest LED Coordinate:
- In our case, the furthest out LED is at position [17,6], therefore our Size field needs to be [18,7].
xxxxxxxxxxexport function Size() { return [18, 7]; }If the Number of LEDs does not Match the Number of vKeys you have:
- You will need to add vKeys, vKeyPositions, and vKeyNames to match the number of Total LEDs.
- In our case, the device had 119 LEDs, so we needed to add 32 LEDS for the keyboard's underglow.


If the keyboard doesn't respond it is highly recommended to go to the device and review the device console. The most common error is not having the same amount of values in each of the vKeys, vKeyNames, and vKeyPositions (they must be the same amount) otherwise you will see the error: TypeError: Cannot read property '0' of undefined. If you used a template file you can disable the device in SignalRGB and the console will output how many values are in each of the arrays mentioned.
- If the number of vKeys matches the number of Total LEDs and the device is sized properly, but the LEDs are improperly mapped:
- Join the discord and ask for help in the QMK channels.
Currently QMK keyboards are only supported in Wired mode, Bluetooth and 2.4Ghz Wireless modes are currently unsupported. Bluetooth as it stands may never be supported due to bandwidth limitations, 2.4Ghz may be supported in the future depending upon the implementation of the wireless dongle and firmware.